We may include affiliate links and curated AI content to highlight top design styles.
Creating a Kid-Friendly Snack Zone in Your Pantry
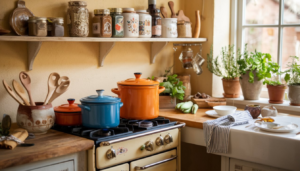
In today’s busy world, setting up a pantry that caters to the needs of children is crucial for fostering independence and promoting healthy eating habits. By positioning snacks on lower shelves and using transparent, labeled containers, you make it easier for your kids to find and choose their snacks. This not only simplifies your routine but also empowers your children to make their own choices.
Why Accessibility Matters
Accessibility is key in a child-friendly pantry. When kids can easily see and reach their snacks, they’re more likely to feel confident in making their own food choices. For example, a clear bin labeled with “Fruits” can house individual packets of dried fruits and natural fruit bars, making it simple for kids to grab a healthy option.
Maintaining Variety and Order
Keeping your pantry organized and full of variety doesn’t have to be a time-consuming task. Rotate snacks regularly to keep things interesting for your children.
Invest in storage solutions like stackable bins or lazy Susans to maximize space and keep different snack types visible and reachable.
Product Recommendations for an Organized Pantry:
Consider products like the OXO Good Grips POP Containers. These are excellent for storing snacks as they are clear, stackable, and come in various sizes to accommodate different items.
Labels can be attached to the front, making it easy for kids to find what they’re looking for.
By implementing these strategies, you create a pantry that supports your child’s independence and encourages healthy eating habits. A well-organized snack zone not only benefits the kids but also reduces stress for you, making snack time a smooth and enjoyable experience for everyone.
1. Utilize Lower Shelves
Start with the Bottom Shelves
When you’re organizing your pantry, begin with the lower shelves. This isn’t just a handy tip; it’s crucial for safety and accessibility.
Placing heavier items like canned goods or bulk rice and beans on the bottom helps stabilize the pantry, making it safer. This way, there’s less risk of heavy objects falling, especially when kids are searching for snacks.
Make Snacks Accessible and Safe
On these bottom shelves, include a variety of snacks that appeal to children.
Strike a balance between healthy options like whole-grain crackers, dried fruits, and the occasional treat like granola bars or fruit snacks. Having these within reach encourages kids to pick their own snacks, fostering independence while ensuring they’ve healthier choices.
Label for Ease
Clearly label each section of your pantry.
This helps everyone know where to find and replace items, keeping your pantry orderly. Regularly rotating the snacks on these lower shelves keeps the selection interesting and encourages kids to try new things.
Keep It Fresh and Interesting
Continuously updating the snack options not only maintains freshness but also keeps the kids curious and interested in healthy eating.
Introducing new snacks periodically can be a fun surprise that they look forward to.
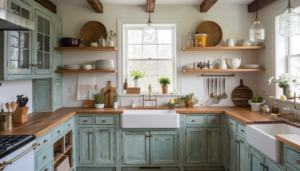
2. Clear Storage Bins
Upgrade Your Pantry with Clear Storage Bins
In recent times, more and more people are choosing clear storage bins for organizing their pantry spaces. These transparent containers allow you to quickly see what’s inside without opening them. This not only saves time but also makes it easier to keep track of your inventory – you’ll know exactly when it’s time to restock essentials like pasta or beans.
These bins are designed to stack securely on top of each other. This feature is crucial as it maximizes the use of vertical space in your pantry, allowing you to store more items in the same footprint. The neat arrangement also makes it simpler to access what you need without disrupting the order of other stored items.
For instance, consider the popular OXO Good Grips POP Containers. These are highly recommended for their durability and airtight seals, ensuring your food stays fresher longer. Their clear construction and stackable design exemplify the practicality and efficiency of using clear bins in home organization.
Integrating clear storage bins into your pantry isn’t just about aesthetics; it’s a practical decision that enhances the functionality of your storage space. By adopting this method, you can minimize the time spent searching for items and maintain a better-organized kitchen.
Plus, the visual appeal of a neatly arranged, visible pantry can make cooking and grocery shopping more efficient.
3. Benefits of Visibility
Maximize Pantry Efficiency with Clear Storage Bins
In today’s fast-paced world, saving time is crucial, especially in routine tasks like managing your pantry. Switching to clear storage bins can significantly streamline how you organize kitchen essentials. With these transparent containers, you can quickly identify what’s in your pantry, eliminating the need to sift through items and reducing clutter.
Foster Independence in Kids Through Visible Snack Options
Transparent bins are excellent for children as they make snack choices visible and accessible. This setup encourages kids to pick their snacks without assistance, fostering independence and decision-making skills.
It also allows parents to effortlessly monitor snack choices, ensuring kids opt for healthy options without constant supervision.
Efficient Inventory Management
Using clear bins helps in keeping an eye on your stock levels. You’ll easily notice when items are running low, which helps in planning your shopping list more accurately.
This method prevents the common issue of overbuying or running out of essential items, ensuring you always have your family’s favorite snacks on hand.
Recommendations for Choosing the Right Bins:
When selecting clear storage bins, opt for BPA-free plastic or glass options to ensure food safety. Brands like OXO Good Grips and The Container Store offer a variety of sizes and designs that can fit different pantry layouts and storage needs.
4. Stacking and Accessibility
Effective Pantry Organization: Stacking and Accessibility Tips
In today’s fast-paced lifestyle, keeping your pantry organized is more crucial than ever. Clear storage bins are incredibly useful for organizing because they allow you to see what’s inside without opening them and use your vertical space efficiently. When selecting bins, opt for models that are designed to stack well. This approach not only saves space but also prevents the bins from falling, making your pantry safer and more functional.
Optimize for Easy Access
To make things easier for everyone, especially kids, place their favorite snacks and frequently used items on the lower shelves. This strategy isn’t just about convenience; it’s about safety too, as it reduces the risk of accidents caused by items falling from above.
For those items you use less often, the top shelves are perfect. It’s also a good practice to label each bin clearly on multiple sides. This makes it easier to identify what’s inside from any direction, saving you time when you’re cooking or restocking.
Why Clear Bins and Labels Matter
Using clear bins and labeling them effectively can transform how you use your kitchen. It cuts down on time spent searching for items and helps in maintaining an inventory of your supplies. This is particularly beneficial in busy households where time and efficiency are paramount.
5. Label Everything
Organize Your Pantry with Clear Labels
In today’s fast-paced world, saving time is more crucial than ever. A well-organized pantry can help you do just that. By using clear labels on every item in your pantry, you can swiftly locate what you need without any hassle. This method not only saves precious minutes but also keeps your pantry looking tidy and modern.
Why is labeling so important? It’s simple: when each item has a clear, readable label, you avoid the frustration of rummaging through similar-looking cans and boxes. Imagine you’re trying to find ingredients for a recipe under time pressure. With everything labeled, you can easily grab what you need and get started with your cooking, stress-free.
To make the most of this organization strategy, choose labels that are easy to read and stick well to surfaces. Avery Permanent Labels are a great choice because they’re durable and come in various sizes that fit different containers. They’re also resistant to water and oils, which is perfect for pantry storage conditions.
Remember to update labels as you restock your pantry to keep everything current. This small step can significantly enhance your cooking efficiency and reduce daily stress.
Choose Clear Labels
– Streamline Your Pantry with Clear Labeling
Organizing your pantry with clear, easy-to-read labels not only saves you time but also reduces the hassle of searching for items. When designing labels, consider your family’s needs. Choose bold, large fonts and colors that contrast sharply with the pantry interior, ensuring that even children can easily spot their favorite snacks.
– Incorporate Color Coding for Efficiency
Introducing a color-coding system can greatly enhance both the functionality and appearance of your pantry. For example, use blue labels for breakfast items, red for snacks, and green for baking supplies. This strategy not only makes your pantry more visually appealing but also aids in quick identification, which is especially helpful for kids.
– Choose Durable Materials for Longevity
It’s important to select labels that can withstand various conditions, especially in a busy household. Opt for waterproof, sturdy materials like clear, adhesive-backed plastic, which adheres well and is resilient against wear.
Ensure the labels are easy to change or remove, which is crucial for updating the contents as your needs evolve.
– Benefits of Labeling
Labeling each item in your pantry simplifies your cooking process and helps everyone know where to find things. This method is a great way to keep your kitchen organized. By marking shelves and bins, you create an efficient system that enhances how your household functions. Such organization reduces the time spent looking for ingredients, making your kitchen operations smooth.
Why Labeling Matters: The advantages of labeling extend beyond just convenience. For children, well-marked containers foster independence, allowing them to get their own snacks or assist in cooking without needing constant help. This setup also encourages everyone to put things back in their rightful place, keeping the pantry orderly.
Moreover, labeling is crucial for tracking expiration dates and managing your pantry inventory. Keeping an eye on these details helps prevent food from going to waste, which can save you money over time. By using simple labels, you not only tidy up your space but also enhance the functionality of your daily routines.
Transform Your Pantry: Turn your pantry into a highly functional area with just a few well-placed labels. Consider using durable, easy-to-read labels like the Brother P-Touch label maker, which prints weather-resistant labels that are perfect for kitchen use. This small step can make a big difference in how your kitchen operates.
6. Use Lazy Susans
Incorporating a Lazy Susan into your pantry setup can significantly optimize how you store items. This rotating tray makes it easy to reach snacks, especially useful for ensuring kids make healthy eating choices. By simply spinning the Lazy Susan, you bring healthier snacks into immediate view. This not only helps in using up snacks that might otherwise go stale but also aids in maintaining a rotation that keeps everything fresh.
To make the most out of your Lazy Susan, consider organizing it by snack type or nutritional content. For example, dedicate one section for fruits and nuts and another for whole-grain snacks like crackers and cereals. This organization method not only keeps your pantry tidy but also serves as a practical lesson for your kids on how to categorize different foods, which can be both fun and instructive.
Why is this setup beneficial? Organizing your snacks on a Lazy Susan not only saves time but also promotes better dietary choices by making healthier options more visible and accessible. It’s a straightforward solution to encourage good eating habits at home.
To enhance your pantry even further, you might want to look for Lazy Susans with dividers or multiple tiers, allowing you to separate different types of snacks clearly. Brands like Copco and YouCopia offer excellent options that come with segmented or tiered designs, perfect for a family-friendly pantry.
7. Install Pull-Out Drawers
Upgrade Your Pantry with Pull-Out Drawers
Transform your pantry with the addition of pull-out drawers. This upgrade not only improves how you organize and access everyday items like snacks but also helps in maintaining an orderly space.
Especially for families, these drawers are a game-changer as they make it simple for kids to get what they need without turning everything upside down.
Choosing the Right Materials
When picking out pull-out drawers, you should consider both the material and the functionality.
Wood and metal are popular choices because of their durability and ability to withstand frequent use. Make sure the material fits well with the overall look of your pantry to maintain a cohesive design.
The functionality of the drawers depends significantly on the quality of the slides. Choose high-quality slides that support a heavy load and allow the drawers to open and close smoothly.
Installation Tips
Firstly, measure your pantry carefully to ensure that the drawers you choose will fit perfectly. Proper fit is crucial not only for maximizing space but also for ensuring that everything is easily accessible.
Install the slide mechanisms securely to the pantry shelves and to the drawers themselves. Before you start using them, check that the drawers open smoothly and hold well when extended.
Enhancing Usability and Aesthetics
Installing pull-out drawers can significantly enhance the functionality and appearance of your pantry.
They make it easier to find and reach items without having to dig through a cluttered space. This is particularly useful in busy households where easy access can save time and reduce stress during meal preparation.
8. Hang Snack Baskets
Optimize Your Pantry with Snack Baskets
Streamline Your Storage:
To make the most of your pantry space, consider hanging snack baskets on the inside of the door. This approach taps into often overlooked vertical space, providing a neat solution for storing snacks.
First, measure your door to choose the right size baskets. Opt for wire baskets if you want to keep items visible and ensure airflow, or select solid bins for a cleaner look that hides away mess.
Organize by Theme:
Sorting snacks into themed baskets can be a game-changer. For instance, allocate one basket for healthy choices like granola bars and dried fruits, and another for treats like chips or cookies.
This method helps everyone in the family easily find what they’re looking for while adhering to dietary preferences or restrictions.
Easy Installation Tips:
Installing these baskets is straightforward. Use hooks that hang over the door or a non-damaging mounting system to protect your pantry door.
Make sure the baskets are secure and placed at a height that kids can reach comfortably. Regularly switch out the snacks to keep options fresh and interesting, which can also encourage kids to try new foods independently.
Why It Works:
This setup not only maximizes your pantry space but also helps streamline your daily routines. By having specific spots for different types of snacks, it reduces time spent searching and offers a simple system for kids to follow.
It’s a practical update that can make a big difference in how your kitchen functions.
Considerations for Product Selection:
When selecting products, consider durability and usability. For example, the ClosetMaid Adjustable Wall & Door Rack is a great choice for wire baskets, while the mDesign Deep Plastic Kitchen Storage Organizer Bin could be ideal for those who prefer a more concealed look.
Each product offers unique benefits, so choose based on your specific needs and pantry size.
Incorporate these tips to effectively utilize the space in your pantry and keep snacks neatly organized and accessible. This not only helps in maintaining an orderly kitchen but also supports healthy eating habits by segregating snacks thoughtfully.
9. Create Snack Zones
Create Your Own Snack Zones
To elevate your pantry’s function, consider organizing it into designated snack zones. This method not only helps in keeping your pantry tidy but also caters to the different preferences and needs of your family.
For example, you can set up a lower shelf that’s accessible to children, filled with snacks that they can easily grab. This strategy prevents them from disrupting other food items and promotes independence.
In each zone, prioritize healthy choices. By placing fruits, nuts, and whole-grain snacks at eye level, you naturally encourage healthier eating habits.
Use the top shelves for treats that are okay to enjoy occasionally, keeping them out of direct sight to help control temptation.
For clarity and ease of use, label each zone distinctly. Opt for bright, engaging labels that not only help everyone know where items belong but also add a splash of style to your pantry.
Clear labeling assists in maintaining the neatness of your snack zones, making it easy for family members to find what they need and put things back in their place.
Why It Matters
Organizing your pantry into snack zones can simplify your life by making it easier to find and manage groceries.
It’s especially helpful in a busy household where easy access to snacks can save time and reduce mess. Moreover, by strategically placing healthier options where they’re most visible, you encourage better eating habits among your family members.
Remember to update your pantry setup occasionally to match your family’s changing tastes and dietary needs. This proactive approach ensures that your snack zones remain useful and effective.
10. Use Door Organizers
When setting up your pantry, choosing the right door organizers is essential. Opt for ones that fit well and serve your storage purposes. This won’t only make your space more efficient but also easier to manage.
Most door organizers are easy to install—just follow the manufacturer’s guidelines to avoid any mishaps.
These organizers are a game-changer for increasing storage space. For instance, adjustable racks can be tailored to fit various item sizes, making them versatile. Brands like ClosetMaid and Rubbermaid offer reliable options that are easy to set up and use.
Remember, a well-organized pantry can save you time and reduce stress when you’re cooking or grocery shopping. By clearly seeing what you have, you’ll avoid buying duplicates or letting food go to waste. Plus, it can make meal planning a breeze.
Selecting Door Organizers
– Maximize Your Pantry Space with Smart Door Organizers
The back of your pantry door is a hidden gem for creating extra storage space. By using this space smartly, you can make your pantry more organized and easier for kids to use.
Here’s how to choose the right door organizers:
Magnetic Organizers: Ideal for metal doors or doors with metal accents, magnetic organizers allow you to easily attach and rearrange items. They’re great for keeping essentials like scissors or snack packs within easy reach.
Multi-Pocket Organizers: These come with various-sized pockets and are fantastic for organizing smaller items such as snacks, granola bars, or juice boxes. Their design lets kids quickly find and grab what they need, promoting independence.
Over-the-Door Racks: Perfect for storing bulkier items like cereal boxes or dinnerware, these racks are robust and offer plenty of space, helping to keep everything neat and orderly.
When installing door organizers, consider the height and ease of access for children. Position everyday items within their reach to foster self-reliance and keep your pantry tidy.
Opt for organizers that are sturdy and simple to clean to ensure they last through daily use.
Choose wisely to transform your pantry into a streamlined and child-friendly area. This small change can make a big difference in how your kitchen functions day-to-day.
Installation Tips
Select the Right Tools for the Job To ensure your door organizers are securely mounted, first gather the necessary tools and hardware. A dependable drill, a straightedge, screws, and possibly wall anchors are crucial, especially if your door is made of a softer material like wood or hollow-core.
Having these tools ready will streamline the installation process.
Adjust Shelf Height for Easy Access Adjusting the shelves to suit your children’s reach is crucial for creating a kid-friendly snack zone. Measure your children’s height and set the shelves at levels where they can easily access their snacks without climbing or assistance.
Mark these spots with a pencil before drilling to keep everything organized.
Ensure Straight Installation Using the straightedge as a guide, ensure your door organizer is perfectly vertical before you start securing it. This is key to prevent any slanting that could cause items to slip off.
Attach the organizer with screws at each marked point. For hollow doors or if the organizer wobbles, reinforce it with wall anchors for a solid fit.
11. Incorporate Fun Colors
Transform Your Pantry with Vibrant Colors
Revamping your pantry with vibrant colors can make it a more enjoyable and functional space. Especially if you have kids, a colorful snack area can motivate them to choose healthy options and serve themselves.
Here’s a straightforward guide to adding color to your pantry:
1. Select Bright Containers Choose storage containers in vivid colors. This not only makes your pantry look welcoming but also helps children identify and access their snacks effortlessly. For instance, bright yellow bins can be used for storing dried fruits, making them easy to spot.
2. Add Dynamic Patterns Incorporate shelf liners, bins, and baskets with dynamic patterns like stripes, polka dots, or even cartoon motifs. This not only livens up the space but also helps organize snacks by type or food group, making it easier for everyone to find what they’re looking for.
3. Creative Labeling Use colorful labels to make categories clear. Assign different colors to different types of food, such as green for vegetables and red for fruits. This method not only beautifies the pantry but also supports educational color-coding for kids, helping them learn where things belong.
By following these simple steps, you can transform your pantry into a place that both kids and adults will love.
It’s a practical way to encourage healthier eating habits in a fun, visually appealing environment.
12. Adjustable Shelving Options
Transform Your Pantry with Adjustable Shelving
Adjustable shelving is a game-changer for organizing your pantry. It allows you to tailor your storage space to meet your specific needs. When selecting shelves, opt for durable materials that are capable of bearing the weight of your pantry goods. This is crucial because sturdy shelves ensure safety and longevity.
Installation Tips for Optimal Functionality
Installing your adjustable shelves need not be daunting. Here are a few straightforward tips to help you set up efficiently:
- Measure Accurately: Before purchasing, measure your pantry space to determine the optimal shelf size. This prevents the inconvenience of adjustments later.
- Choose the Right Tools: Equip yourself with the necessary tools such as a level, drill, and screws. This makes the installation smoother and quicker.
- Seek Professional Advice if Unsure: Don’t hesitate to consult with a professional if you’re uncertain about the installation process. A small tip from an expert can save you time and prevent mistakes.
Why Choose Adjustable Shelving?
Adjustable shelving not only maximizes your storage space but also adapts as your storage needs change. For example, if you buy in bulk during holiday seasons, you can easily adjust the shelves to accommodate larger items or more goods.
Product Recommendations
For those looking for reliable shelving options, consider brands like The Container Store’s Elfa system or IKEA’s ALGOT series. These systems are renowned for their durability and versatility, making them excellent choices for any pantry.
In conclusion, adjustable shelving offers a flexible and durable solution for organizing your pantry. By following these simple installation tips, you can ensure your shelves are both functional and stylish.
Benefits of Adjustable Shelves
Adjustable shelves have become a practical solution for enhancing pantry organization, particularly as many people nowadays are focusing on optimizing home spaces for efficiency. These shelves offer the flexibility needed to store items of varying sizes, making them a smart choice for any dynamic household.
Why Adjustable Shelves Are Essential:
- Customizable Storage Options: Adjustable shelves allow you to change the height between each shelf to accommodate larger items like tall cereal boxes or a stack of cans. This capability helps utilize every inch of vertical space, ensuring your pantry remains tidy and well-organized.
- Adaptable Layouts: The ability to rearrange your pantry shelves is invaluable. Whether you’re adjusting for seasonal items or new dietary preferences, these shelves can be modified without any extra cost, keeping your storage area versatile and up-to-date.
- Streamlined Organization: By fine-tuning the heights of your shelves and selecting suitable materials, you can craft a pantry that not only holds more but also simplifies item retrieval. This is especially beneficial in a busy household with diverse needs.
Incorporating adjustable shelves in your pantry can significantly improve how you manage storage space. They allow for a custom arrangement that can evolve with your family’s requirements, making everyday life a bit easier.
With these shelves, you can ensure that everything from snacks to cooking ingredients is easily accessible, promoting a more organized and functional kitchen environment.
Considerations for Choosing Adjustable Shelves: When selecting adjustable shelves, consider durability and ease of adjustment. Products like the Rubbermaid Configurations Custom Closet Deluxe Kit offer robust construction and versatility, making them a popular choice among homeowners looking to enhance their pantry space.
Choosing the Right Materials
– Choosing Materials for Adjustable Shelves
When picking materials for your adjustable shelves, focus on durability and aesthetic appeal. It’s essential for these shelves to be sturdy enough to handle everyday use, especially in a busy family kitchen. Materials like solid wood, metal, and high-density polyethylene are excellent choices because they’re durable and can support heavy items like canned goods and large cereal boxes.
Why Durable Materials Matter
Durable materials prevent frequent replacements and maintain their appearance over time. This is particularly important in high-traffic areas like kitchens. Solid wood and metal not only last long but also add a touch of sophistication to your space.
Aesthetic Appeal and Coordination
The appearance of your shelves should complement your kitchen’s style. If your kitchen has a modern design, consider using sleek metals or clean, white laminates. These materials reflect a contemporary feel.
In contrast, for a traditional kitchen, opt for warm wood tones such as oak or cherry. These choices help create a welcoming atmosphere.
Practical Recommendations
For those with modern kitchens, stainless steel or industrial-grade metal shelving can be both practical and stylish.
If you’re leaning towards a cozy, traditional kitchen, wooden shelves made from maple or pine aren’t only beautiful but also robust.
Installation Tips and Tricks
Now that you’ve picked the best materials for your adjustable shelves, it’s time to install them correctly. Installing them the right way ensures that your pantry is both practical and safe, especially when kids are reaching for snacks.
Here are three essential tips to guide you through the installation process:
- Double-Check Measurements: Before you start drilling or fixing anything, measure the space again. This step avoids unwanted holes in your walls and ensures the shelves fit snugly in their intended spot.
- Use Proper Tools: For a secure and level installation, arm yourself with a power drill, a spirit level, and a stud finder. These tools help streamline the process and prevent any wobbly outcomes.
- Adhere to Guidelines: Your shelving units will likely come with specific instructions. Following these closely not only makes your shelves more durable but also ensures they function as intended.
By keeping these tips in mind, you’ll create a pantry that’s both sturdy and accessible, making snack time easier and safer for everyone.
13. Pre-portion Snacks
Optimize Your Pantry with Pre-Portioned Snacks
In today’s fast-paced world, organizing your pantry by pre-portioning snacks is a smart move. This method not only ensures a variety of snacks but also helps with portion control, which is crucial for maintaining a balanced diet and managing snack supplies efficiently.
Choose Healthy, Diverse Snacks
Begin by picking a mix of nutritious snacks such as whole-grain crackers, dried fruit, nuts, and seeds. Use transparent, sealable bags or reusable containers to divide these snacks into individual portions. If you’re keeping an eye on nutritional intake or if allergies are a concern, make sure to label each container.
Store Snacks Strategically
Keep these pre-portioned snacks in an easy-to-reach spot in your pantry. This placement encourages kids to choose their own snacks independently, which can lead to healthier eating choices. It also cuts down your time spent measuring or estimating snack amounts, making snack time a breeze.
Educate and Empower
This setup not only keeps your pantry tidy but also educates your children about moderation and the importance of healthy eating habits. They learn to understand portion sizes, which can have a long-term positive impact on their eating patterns.
Why It Matters
Pre-portioning isn’t just about convenience; it’s a proactive approach to dietary management. It prevents overeating, minimizes waste, and supports dietary restrictions effectively.
Plus, by involving kids in the process, you’re giving them the tools to make wise food choices on their own, fostering independence and self-regulation from a young age.
14. Utilize Back-of-Door Space
Unlock the Potential of Pantry Door Storage
Making the most of every square inch in our homes has never been more relevant—especially in the kitchen. The back of your pantry door is a goldmine for creating extra storage space, perfect for keeping frequently used items within easy reach.
Let’s turn this often overlooked spot into a handy snack station for your family.
1. Install Adjustable Shelves:
One effective way to utilize the back of your pantry door is to add adjustable shelves. This setup allows you to modify shelf heights to accommodate various snack sizes, from tiny bags of nuts to larger cereal boxes.
Adjustable shelving not only maximizes space but also keeps everything organized and accessible.
2. Opt for Clear Pocket Organizers:
For smaller items, nothing beats the simplicity of clear pocket organizers. They’re excellent for storing individual snack packs, spice sachets, or energy bars.
This visibility makes it a breeze for kids (and adults) to spot and pick their favorite snacks without rummaging through the pantry.
3. Hang Sturdy Wire Baskets:
When it comes to storing items that are a bit heavier, sturdy wire baskets are the way to go. These are perfect for accommodating weightier snacks like fruit cups or juice boxes.
The robust design ensures they hold up well without drooping, keeping your snacks tidy and well-supported.
Why Use Door Storage?
Utilizing the back of your pantry door for storage not only saves space but also makes snack time hassle-free. Everything is visible and reachable, making it simpler for kids to help themselves and for you to keep track of your pantry inventory.
It’s a smart strategy in today’s busy world where convenience and organization go hand in hand.
With these practical and straightforward tips, transforming the back of your pantry door into an efficient storage area is easier than you might think.
Give these ideas a try and enjoy the added convenience and organization they bring to your kitchen!
15. Kid-Level Hooks
Create a Kid-Friendly Pantry with Accessible Hooks
Children love exploring and doing things on their own. By placing hooks at their level in your pantry, you make it easier for them to reach their snacks. This setup not only boosts their independence but also keeps your pantry tidy.
Install sturdy hooks about three feet off the ground, perfect for small hands to use comfortably.
Choose Fun and Functional Designs
Select hooks with fun shapes and bright colors like stars or animals that catch your kids’ eyes and match your pantry’s theme. These details aren’t just decorative; they make your children excited about using the pantry and taking responsibility for their belongings.
Opt for materials that are simple to clean and safe for kids to handle.
Practical Uses for Pantry Hooks
These hooks can do more than hold coats; they’re great for hanging reusable snack bags, small baskets, or personal snack boxes. This organization method not only teaches kids about keeping things in order, but it also makes preparing snacks easy.
By integrating these elements, you transform your pantry into a place that encourages your kids to be self-reliant and tidy.
16. Snack Inventory Chart
Setting up a snack inventory chart in your home can be a game-changer, especially if you have children. This simple, yet effective tool not only helps keep snack items neatly organized but also encourages your kids to make independent and healthy choices when it comes to their own eating habits.
Here’s why you should consider incorporating a snack inventory chart into your family routine:
Visibility: With a snack inventory chart, everyone in the family can see what snacks are available at a glance. This visibility helps to avoid buying too much, thus reducing waste and saving money.
Empowerment: When children have the ability to pick their own snacks from the options listed, they feel in control. This boosts their self-esteem and improves their ability to make decisions.
Education: Managing a snack inventory chart teaches children valuable organizational skills. They learn how to categorize and maintain items, which are crucial skills for personal development.
To get started, organize snacks into categories that appeal to kids, such as fruits, veggie sticks, and whole-grain crackers.
Regularly update the chart, preferably weekly, to keep it current with what snacks are in stock. This practice not only simplifies your life but also promotes healthier eating habits in your children.
17. Weekly Snack Prep Station
Set Up Your Weekly Snack Prep Station
Once you have your snack inventory chart ready, it’s time to set up a weekly snack prep station. This spot in your kitchen or pantry will be where you and your kids can prepare healthy snacks for the week ahead. Choose a convenient location, ideally near where you store your snacks for easy access.
Why a Snack Prep Station?
Creating a dedicated space for snack preparation does more than just simplify your mornings. It’s an opportunity to teach your children valuable lessons about nutrition and the benefits of planning ahead.
This hands-on experience helps them understand the importance of balanced eating and managing portions.
Getting Started
Begin by gathering all the necessary items: containers, small bags, and a scale to help with portion control. Having these tools on hand will make the process smoother and more efficient.
Involve Your Kids
Include your children in the snack preparation. This is a practical way to spend quality time together while educating them about healthy eating habits.
Let them fill up the containers with a variety of snacks like fruits, nuts, and pretzels. Use the snack chart as a guide to ensure a good mix of nutrients.
Practical Tips and Recommendations
- Containers: Opt for clear, reusable containers which make it easy to see what’s inside and are better for the environment than single-use plastics.
- Scale: A digital kitchen scale is ideal for teaching kids about portion sizes in a tangible way.
Conclusion
You’re on your way to creating an excellent kid-friendly snack zone in your pantry! Start by placing snacks on the lower shelves so that they’re easy to reach for little hands. Opt for clear storage bins and use bright, easy-to-read labels to help your kids find what they’re looking for without any fuss.
Incorporate fun elements like lazy Susans to make items easily accessible and use vibrant containers to add a splash of color and excitement. Consider installing pull-out drawers and hooks to maximize space and keep things neat.
To ensure the area remains organized, introduce a snack inventory chart. This will help track what’s available and what needs restocking. Also, setting up a weekly prep station where you can prepare snack portions in advance will save time during busy days.
By taking these steps, not only will your pantry be better organized, but your kids will also enjoy the independence of grabbing their own snacks. Remember, an organized space encourages responsibility and helps maintain cleanliness. This setup not only simplifies your life but also teaches your children valuable organizational skills.